Output store - AWS S3
How to set up AWS S3 as output storage in Telestream Cloud
Amazon Simple Storage Service (Amazon S3) is an object storage service provided by AWS in multiple geographical regions.
To get started you should first create an account with Amazon Web Services if you haven't got one already. You can do it here.
When you log in to the AWS Management Console sign up for Amazon S3. Go to https://aws.amazon.com/s3/ or select S3 from Services menu when in AWS console. Choose Get started with Amazon S3, then follow the on-screen instructions. You will be notified via email when your account is active.
Creating S3 bucket
Amazon S3 stores your data as objects within buckets that are like folders on your local disk. You can add a bucket for use with Telestream Cloud granting access in two ways:
- using IAM role
- using Access Key and Secret Key pairs
We describe both of them in details. But first let's create the bucket itself. When logged in to AWS console go to S3 and click Create Bucket.
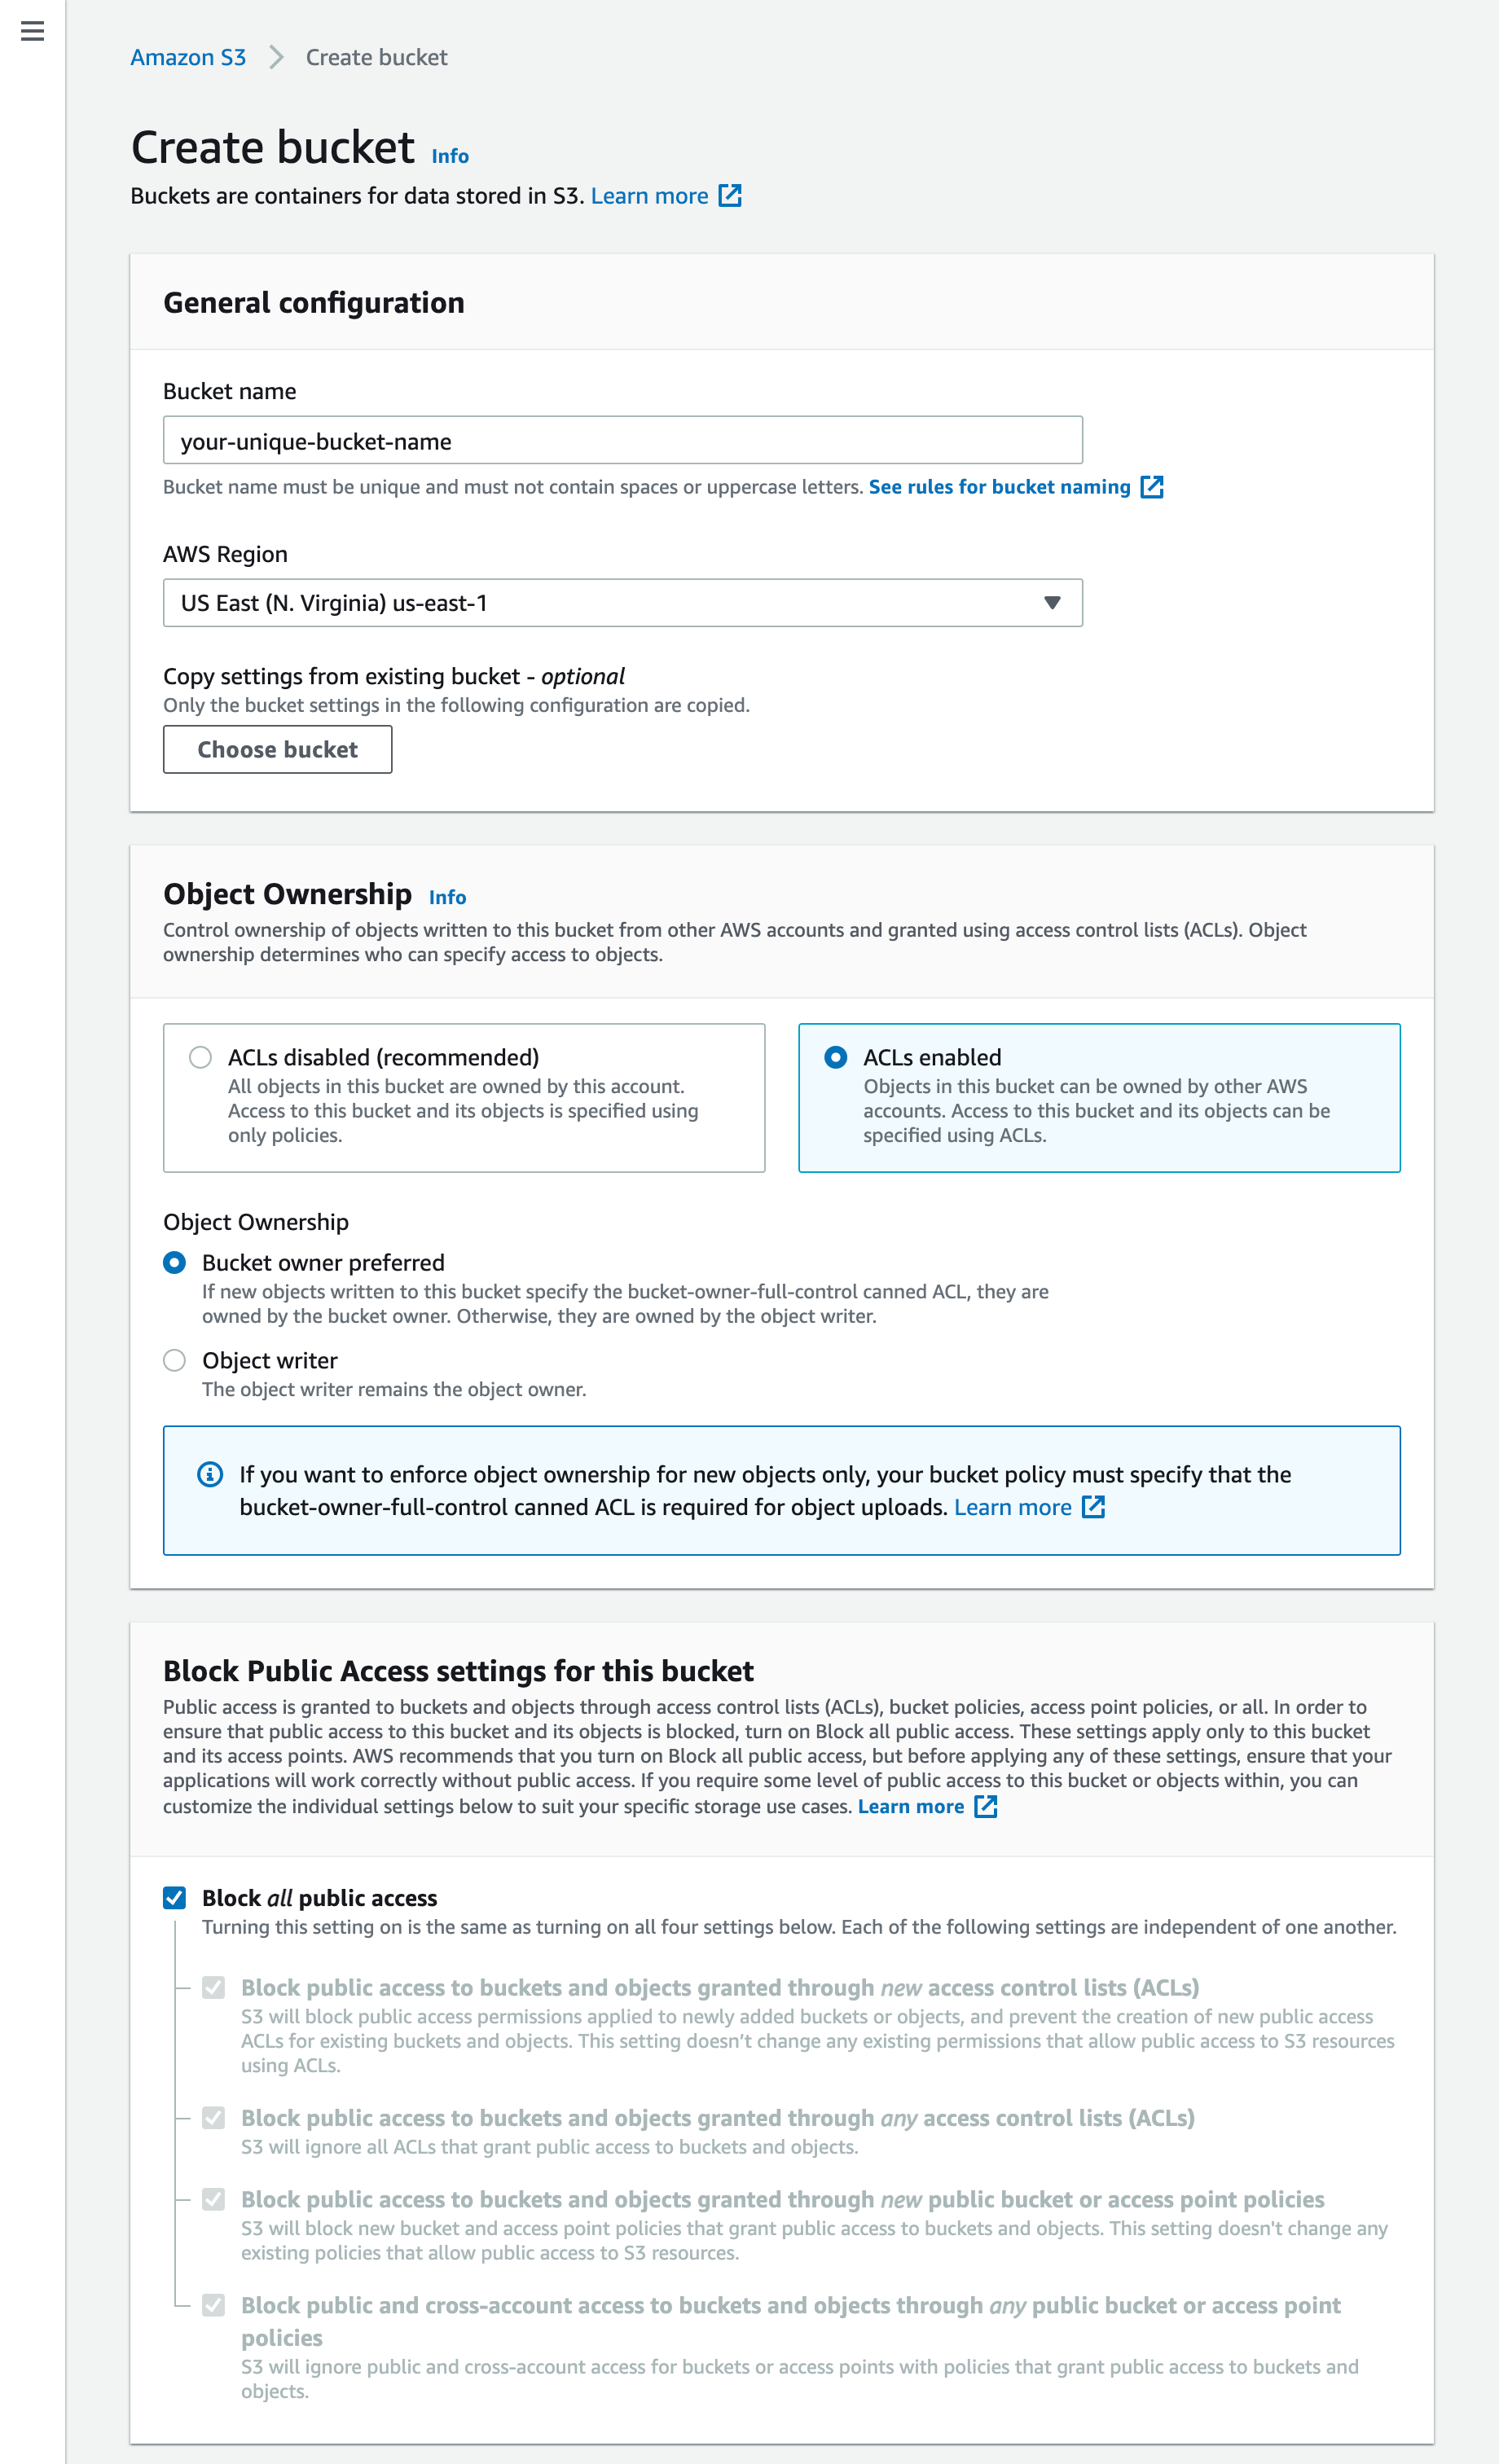
Give your bucket a meaningful name and select the region where you want to store your files (preferably somewhere close to your source content). Make sure Object Ownership “ACLs enabled” checkbox is marked in case of using Access/Secret Key authorization method. Selecting IAM Role does not require this option to be selected. "Bucket owner preferred" is checked instead of enforcing bucket owner to own all objects in the bucket. Keep "Block all public access" checkbox on.
Granting access using IAM Role
IAM roles are AWS identities not associated with one specific user but can be assumed by anyone permitted and have defined policies which determine access rights to your resources. Each roles is identified by Role ARN (Amazon Resource Name) which you will need to provide when adding S3 store to Telestream Cloud.
Create IAM Role
To create a new Role from scratch login to your AWS console and from the Services menu go to Security, Identity & Compliance > IAM > Roles and click Create Role.
By default, the token expiry date is set to 1 hour. It is recommended to change this value to 24 hours so that the generated pre-signed URLs are valid for one day.
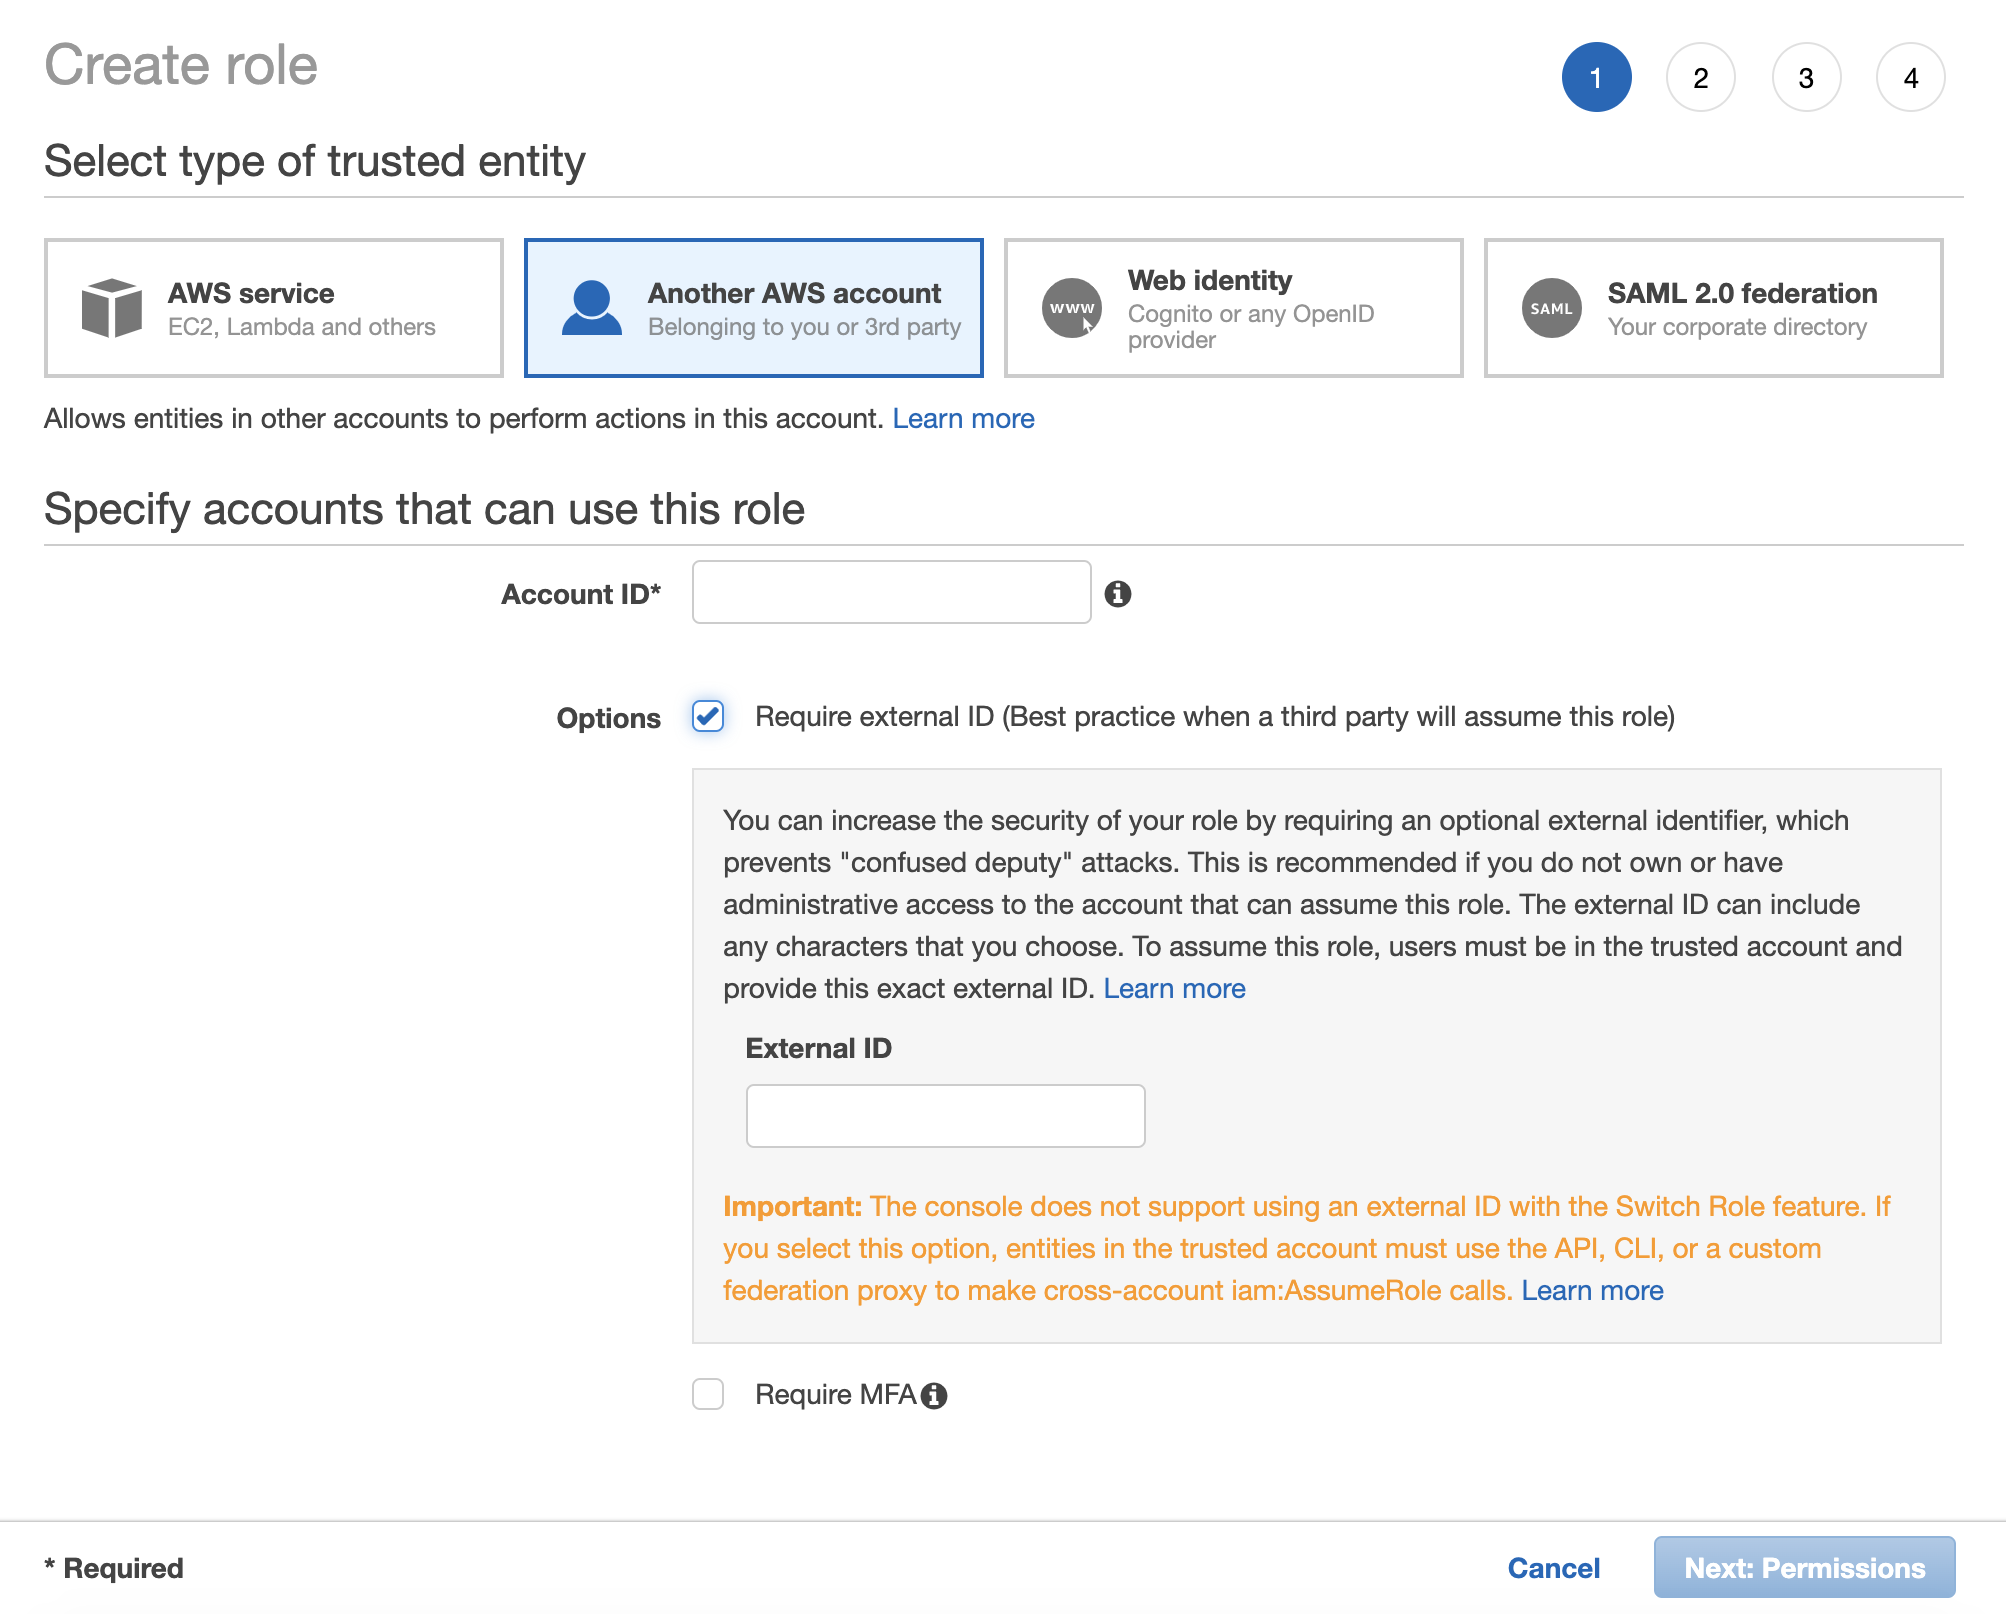
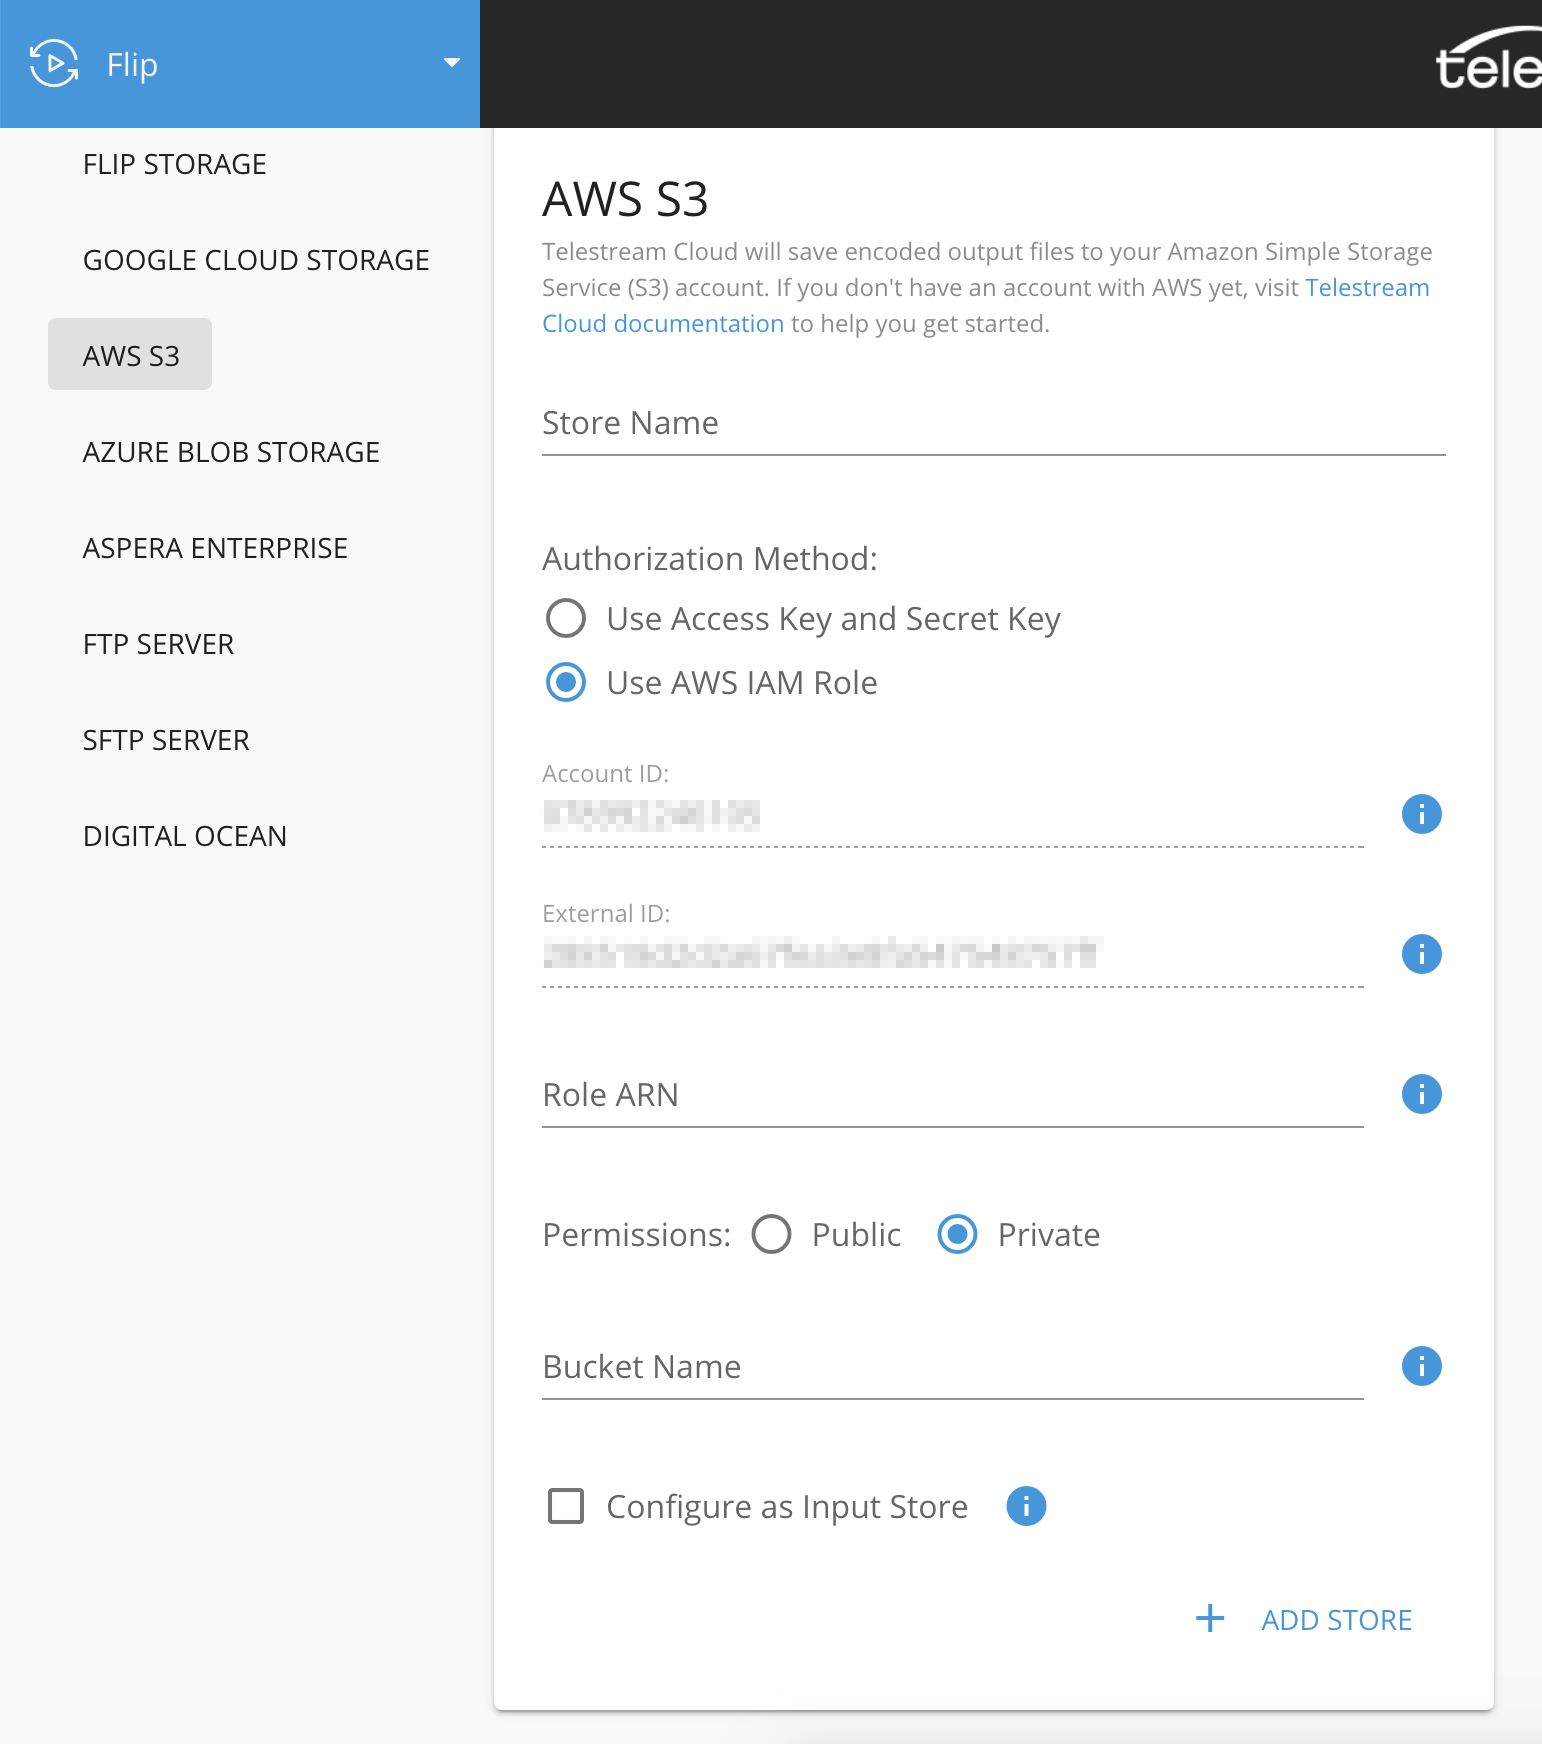
Account ID identifies service that is allowed to use this role, in this case Telestream Cloud. We also require an External ID as additional security measure. To allow us perform actions on your account use values displayed in store configuration form:
Click "Next: Permissions" to go to defining permission policies. You can either use one of the templates provided by AWS (Amazon S3 Full Access policy provides full access to all buckets) or create your own.
Check IAM user permissions
Important: make sure that IAM user that creates the policy has sufficient privileges to grant required rights. While AWS will allow you to create the policy anyway, it doesn't mean we will be able to access the bucket.
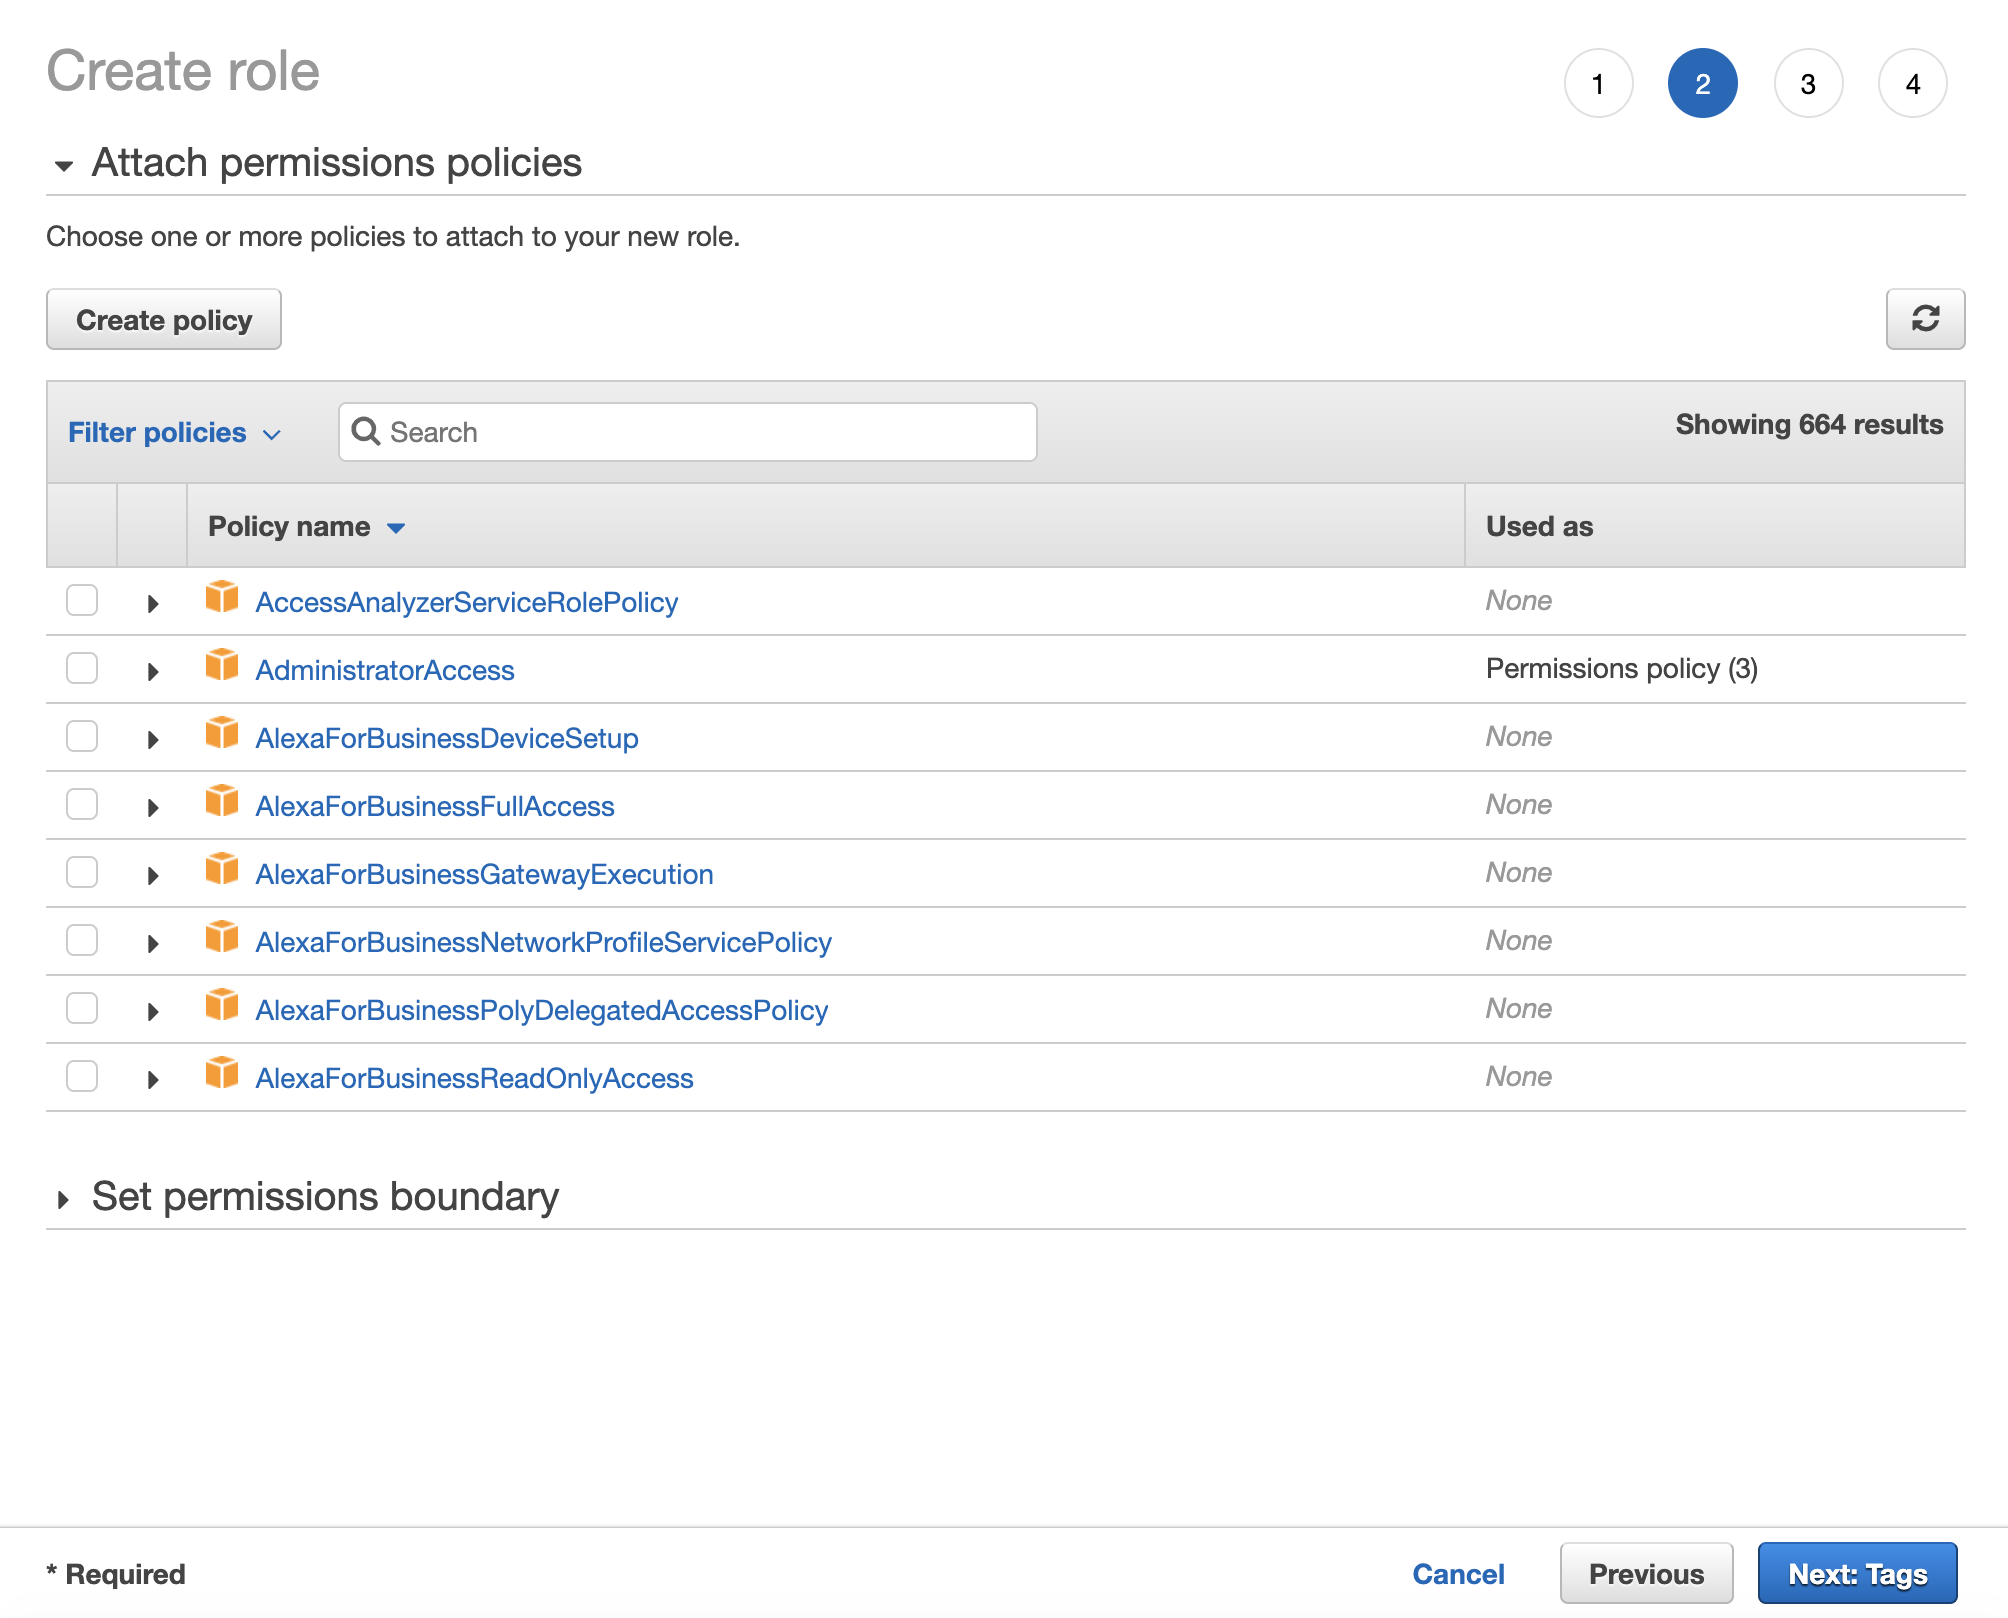
Click "Create Policy" and a new tab with config form will open. When creating a policy select S3 as a service and either select actions in the visual editor or use JSON for that.
Here's an example JSON code (remember to replace YOUR BUCKET with the actual name of the bucket you will use):
{
    "Version": "2012-10-17",
    "Id": "PandaStreamBucketPolicy",
    "Statement": [
        {
            "Sid": "Stmt1",
            "Effect": "Allow",
            "Action": [
                "s3:AbortMultipartUpload",
                "s3:GetObjectAcl",
                "s3:DeleteObject",
                "s3:GetObject",
                "s3:PutObjectAcl",
                "s3:ListMultipartUploadParts",
                "s3:PutObject"
            ],
            "Resource": "arn:aws:s3:::YOUR-BUCKET/*"
        },
        {
            "Sid": "Stmt2",
            "Effect": "Allow",
            "Action": [
                "s3:GetBucketAcl",
                "s3:ListBucket",
                "s3:ListBucketMultipartUploads",
                "s3:GetBucketLocation",
                "s3:PutBucketAcl",
                "s3:GetBucketNotification",
                "s3:PutBucketNotification",
                "s3:GetBucketPolicy",
                "s3:PutBucketPolicy",
                "s3:DeleteBucketPolicy"
            ],
            "Resource": "arn:aws:s3:::YOUR-BUCKET"
        }
    ]
}
If you prefer using a visual editor, select the required set of permissions from each group:
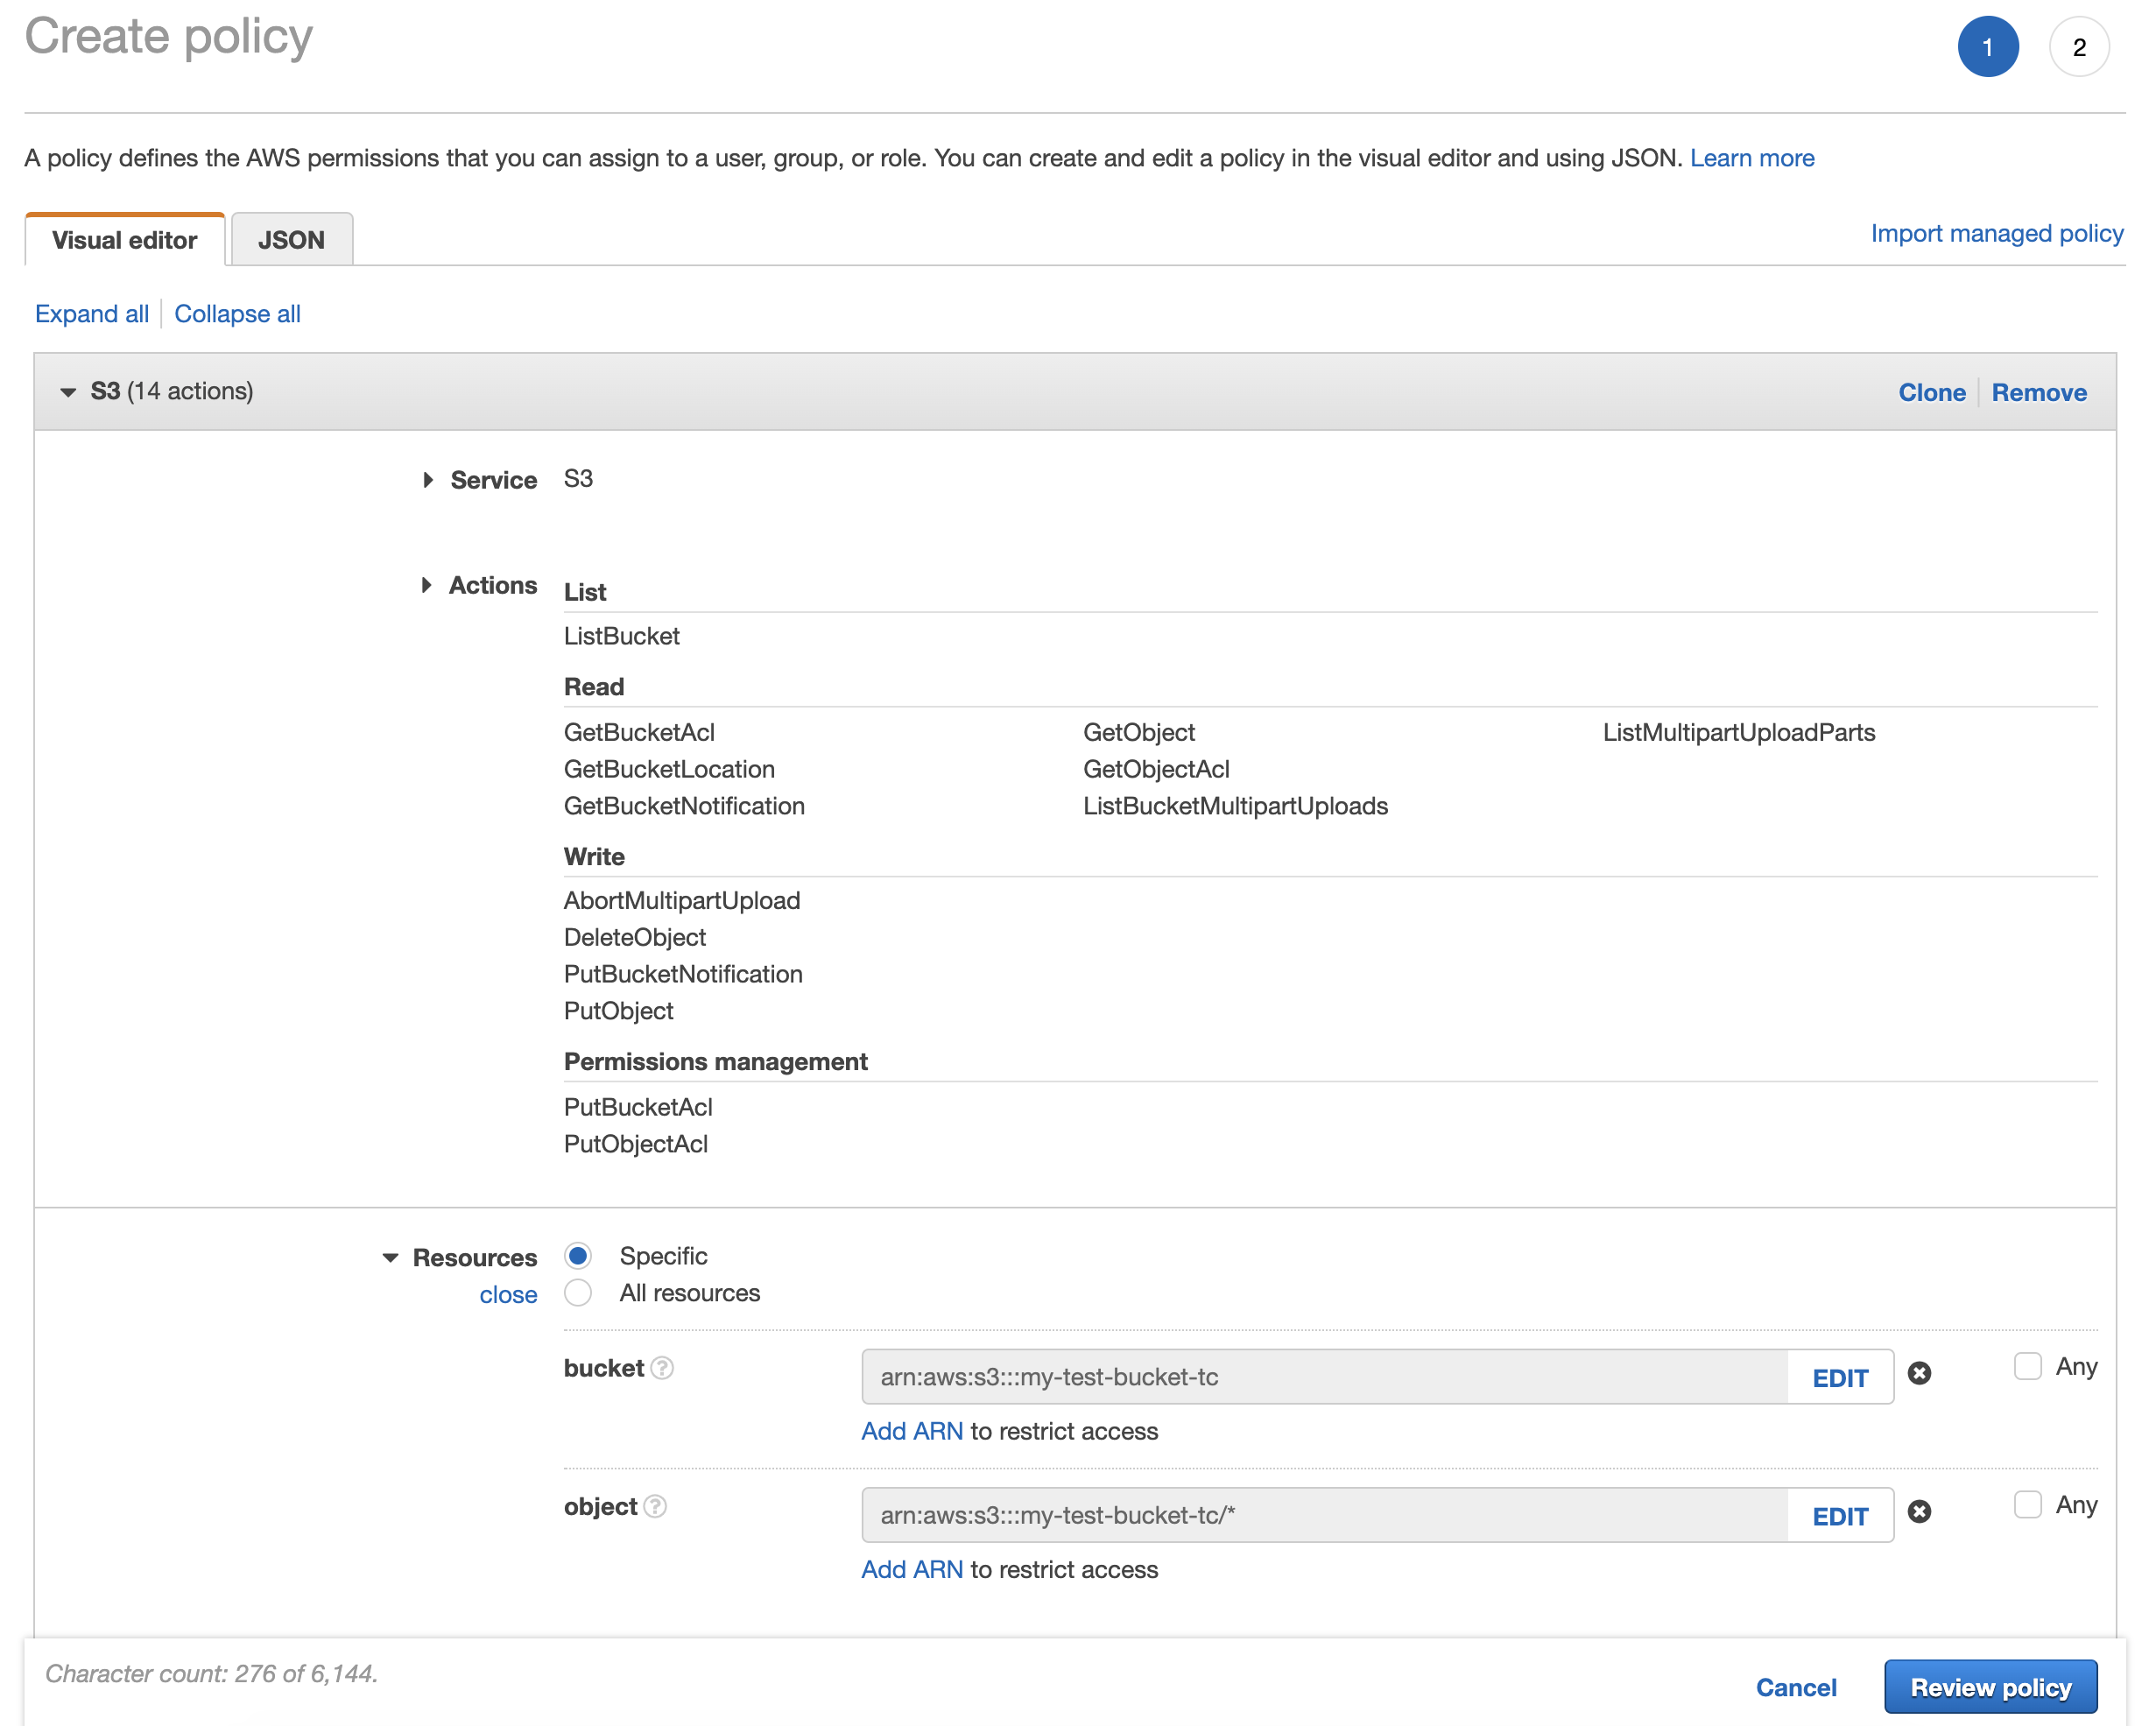
You also need to specify the resources to which this policy applies. Click "Add ARN" and enter the name of the bucket. Also, tick "Any" next to the "Object name" field.
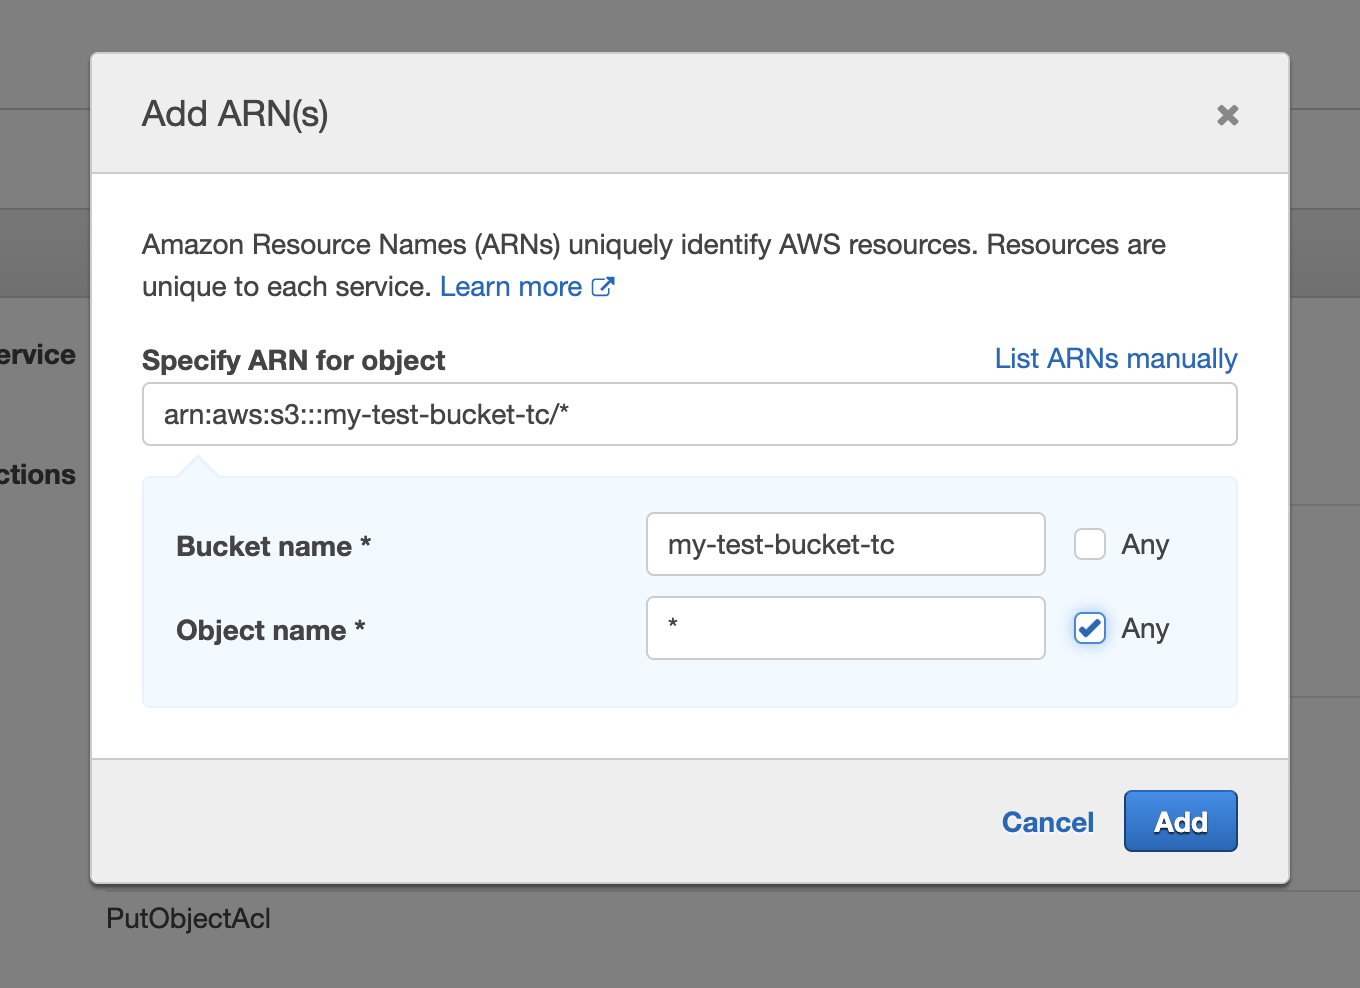
Once done, click "Review policy". This will take you to the last step where you can name your policy.
Now go back to the tab where you started creating IAM role and select your newly created policy to be applied to this bucket.
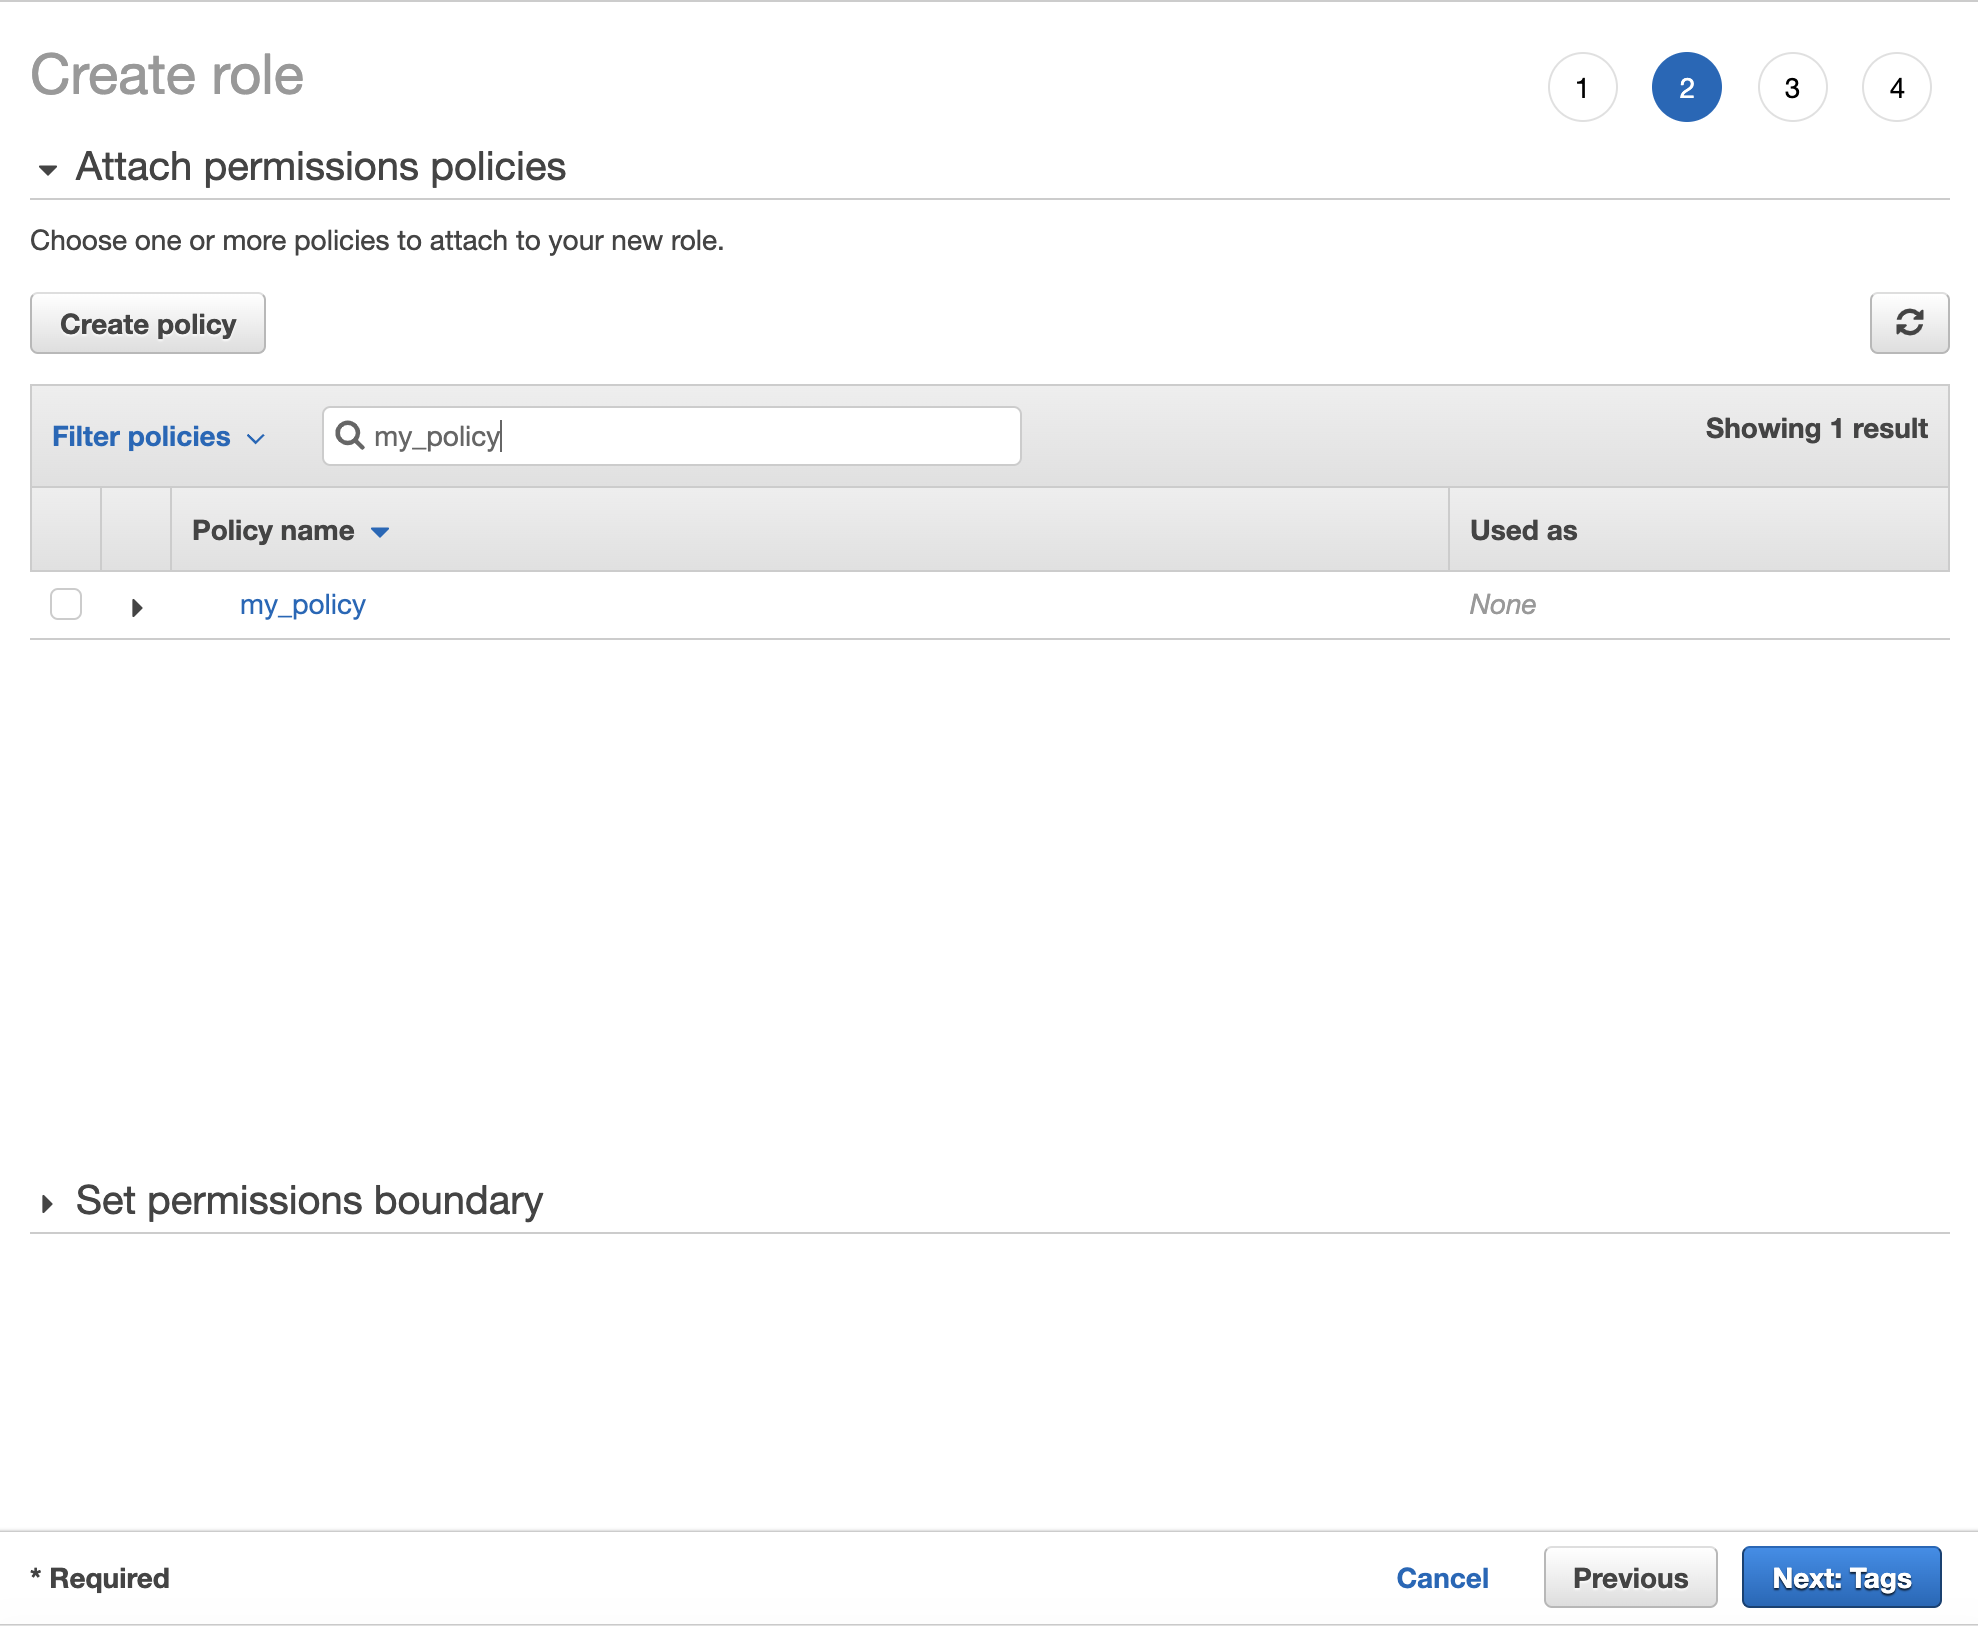
For now, you can ignore setting tags in the next step and just move on to Review, name your role and click "Create Role" to finish the process. You will be taken to the view with the list of all roles in your account. Find the role you just created and click it to view its details.

The first item in the role summary is Role ARN, which is needed to set up your S3 store in Telestream Cloud. Copy it and log in to your Telestream Cloud account.
Using Access Key and Secret Key pairs (Console)
AWS Access Key and Secret Key pairs can be used instead of IAM roles for setting up STORES.
This can be accomplished by accessing the "Identity and Access Management (IAM)" page withing the AWS console. There are 2 methods to creating a new Access Key/Secret Key pair.
- When new adding a new user.
- Manually creating a new Access Key/Secret Key for an existing user.
To create an IAM user (console)
- Sign in to the AWS Management Console and open the IAM console at https://console.aws.amazon.com/iam/
- In the navigation pane, choose Users and then choose Add users.
- Type the user name for the new user. This is the sign-in name for AWS.
- Select the type of access this set of users will have. You can select programmatic access, access to the AWS Management Console, or both.
-
Select Programmatic access if the users require access to the API, AWS CLI, or Tools for Windows PowerShell. This creates an access key for each new user. You can view or download the access keys when you get to the Final page.
-
Select AWS Management Console access if the users require access to the AWS Management Console. This creates a password for each new user.
-
For Console password, choose one of the following:
- Autogenerated password. Each user gets a randomly generated password that meets the account password policy. You can view or download the passwords when you get to the Final page.
- Custom password. Each user is assigned the password that you type in the box.
- Choose Next: Permissions.
- On the Set permissions page, specify how you want to assign permissions to this set of new users. Choose one of the following three options:
- Add user to group. Choose this option if you want to assign the users to one or more groups that already have permissions policies. IAM displays a list of the groups in your account, along with their attached policies. You can select one or more existing groups, or choose Create group to create a new group. For more information, see Changing permissions for an IAM user.
- Choose Next: Tags.
- Choose Next: Review to see all of the choices you made up to this point. When you are ready to proceed, choose Create user.
- To view the users' access keys (access key IDs and secret access keys), choose Show next to each password and access key that you want to see. To save the access keys, choose Download .csv and then save the file to a safe location.
Note
Only the user's access key ID is visible. The secret access key can only be retrieved when the key is created.
To create, modify, or delete your own IAM user access keys (console)
- Use your AWS account ID or account alias, your IAM user name, and your password to sign in to the IAM console.
- In the navigation bar on the upper right, choose your user name and then choose My Security Credentials.
- Expand the Access keys (access key ID and secret access key) section.
- Do any of the following:
- To create an access key, choose Create New Access Key. If this feature is disabled, then you must delete one of the existing keys before you can create a new one. A warning explains that you have only this one opportunity to view or download the secret access key. To copy the key to paste it somewhere else for safekeeping, choose Show Access Key. To save the access key ID and secret access key to a .csv file to a secure location on your computer, choose Download Key File.
- To disable an active access key, choose Make Inactive.
- To reenable an inactive access key, choose Make Active.
- To delete your access key, choose Delete. AWS recommends that before you do this, you first deactivate the key and test that it’s no longer in use. When you use the AWS Management Console, you must deactivate your key before deleting it.
Note:
Only the user's access key ID is visible. The secret access key can only be retrieved when the key is created.
To create, modify, or delete another IAM user's access keys (console)
- Sign in to the AWS Management Console and open the IAM console at https://console.aws.amazon.com/iam/.
- In the navigation pane, choose Users.
- Choose the name of the user whose access keys you want to manage, and then choose the Security credentials tab.
- In the Access keys section, do any of the following:
- To create an access key, choose Create access key. Then choose Download .csv file to save the access key ID and secret access key to a CSV file on your computer. Store the file in a secure location. You will not have access to the secret access key again after this dialog box closes. After you download the CSV file, choose Close. When you create an access key, the key pair is active by default, and you can use the pair right away.
- To disable an active access key, choose Make inactive.
- To reenable an inactive access key, choose Make active.
- To delete your access key, choose Delete. AWS recommends that before you do this, you first deactivate the key and test that it’s no longer in use. When you use the AWS Management Console, you must deactivate your key before deleting it.
Note
Only the user's access key ID is visible. The secret access key can only be retrieved when the key is created.
Once you have your Access Key and Secret Key available please proceed to your Telestream cloud account and begin configuring your store.
Adding S3 store to your Telestream Cloud account.
Once logged in go to Stores Management and click "Add Store"
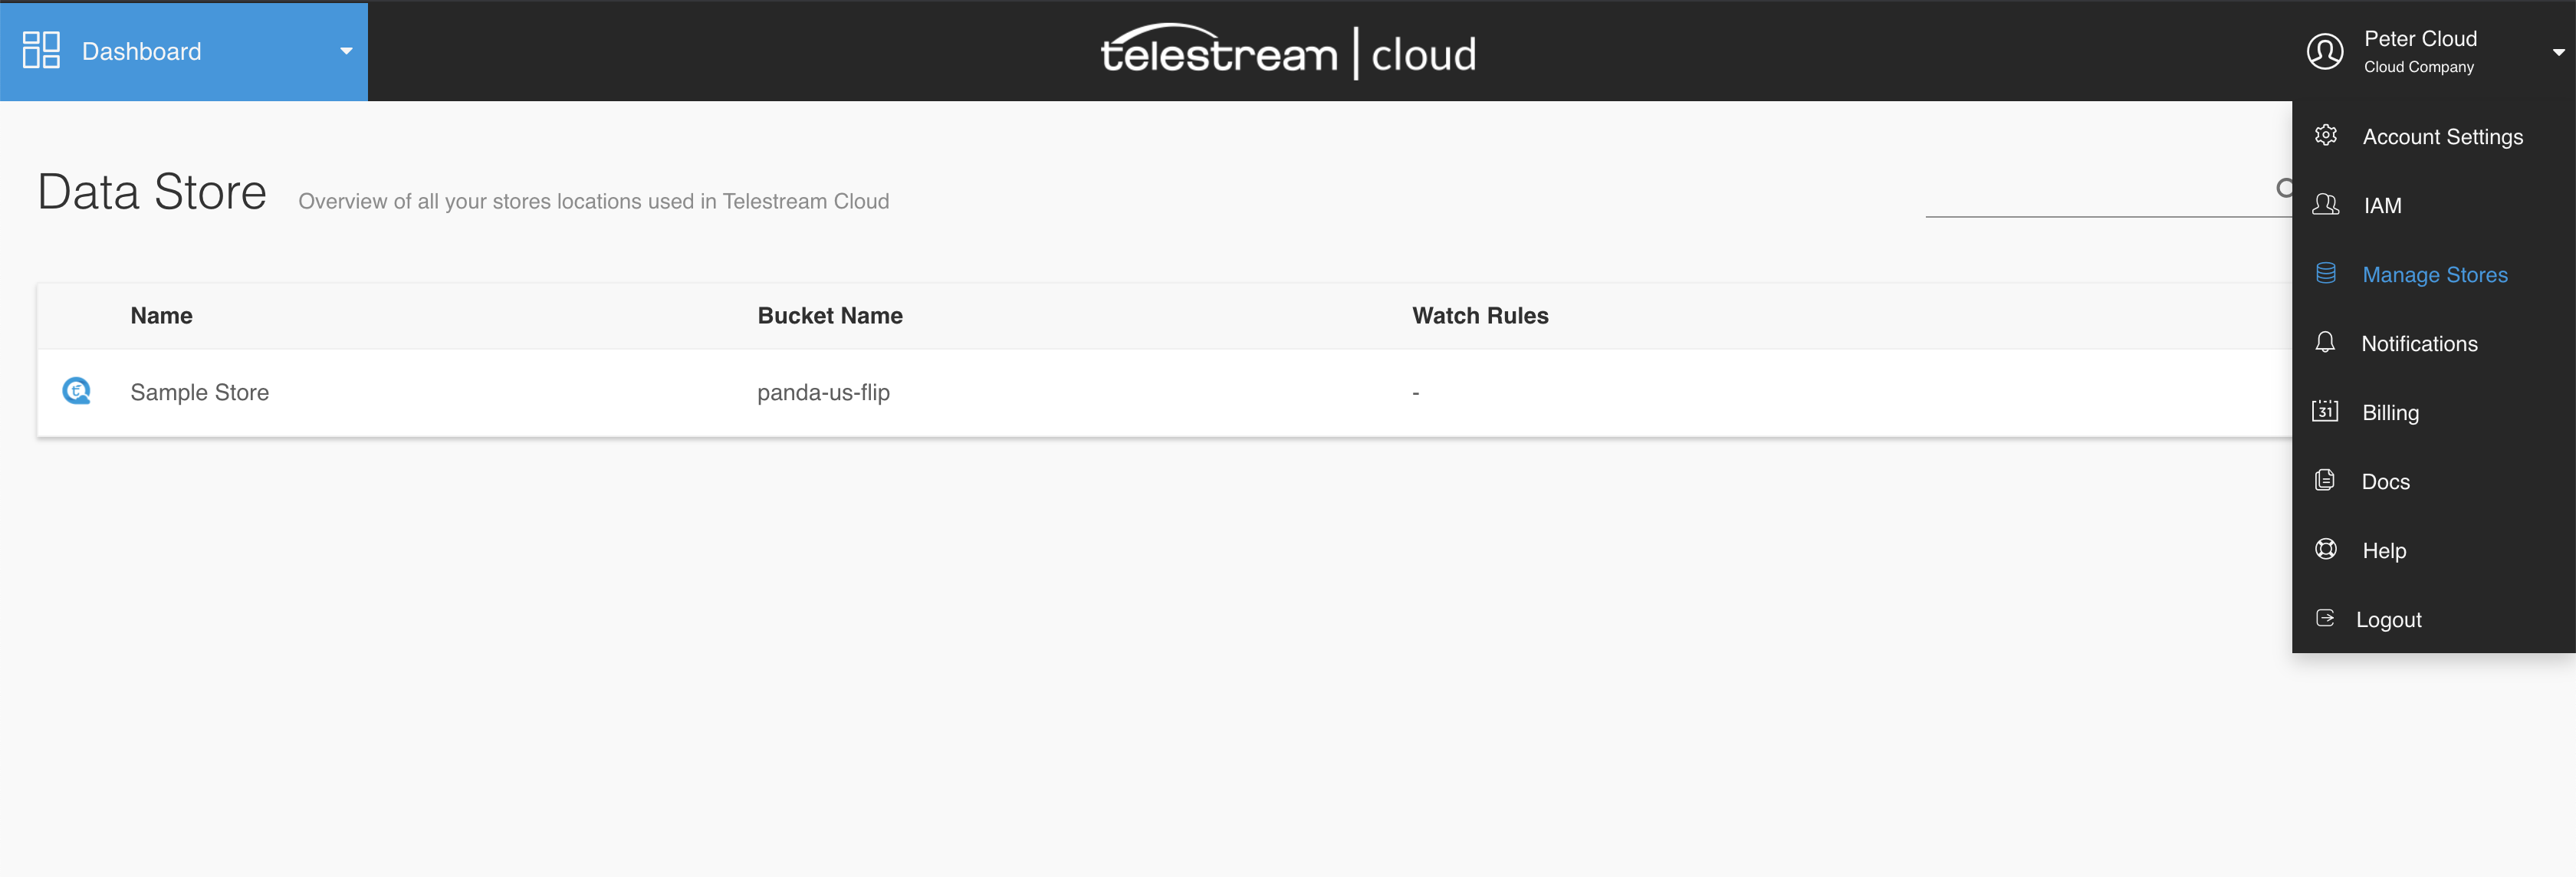
Select S3 as storage type, give it a meaningful name, paste the Role ARN/Access or Secret Key pairs, and enter the name of the bucket you created to store your outputs.
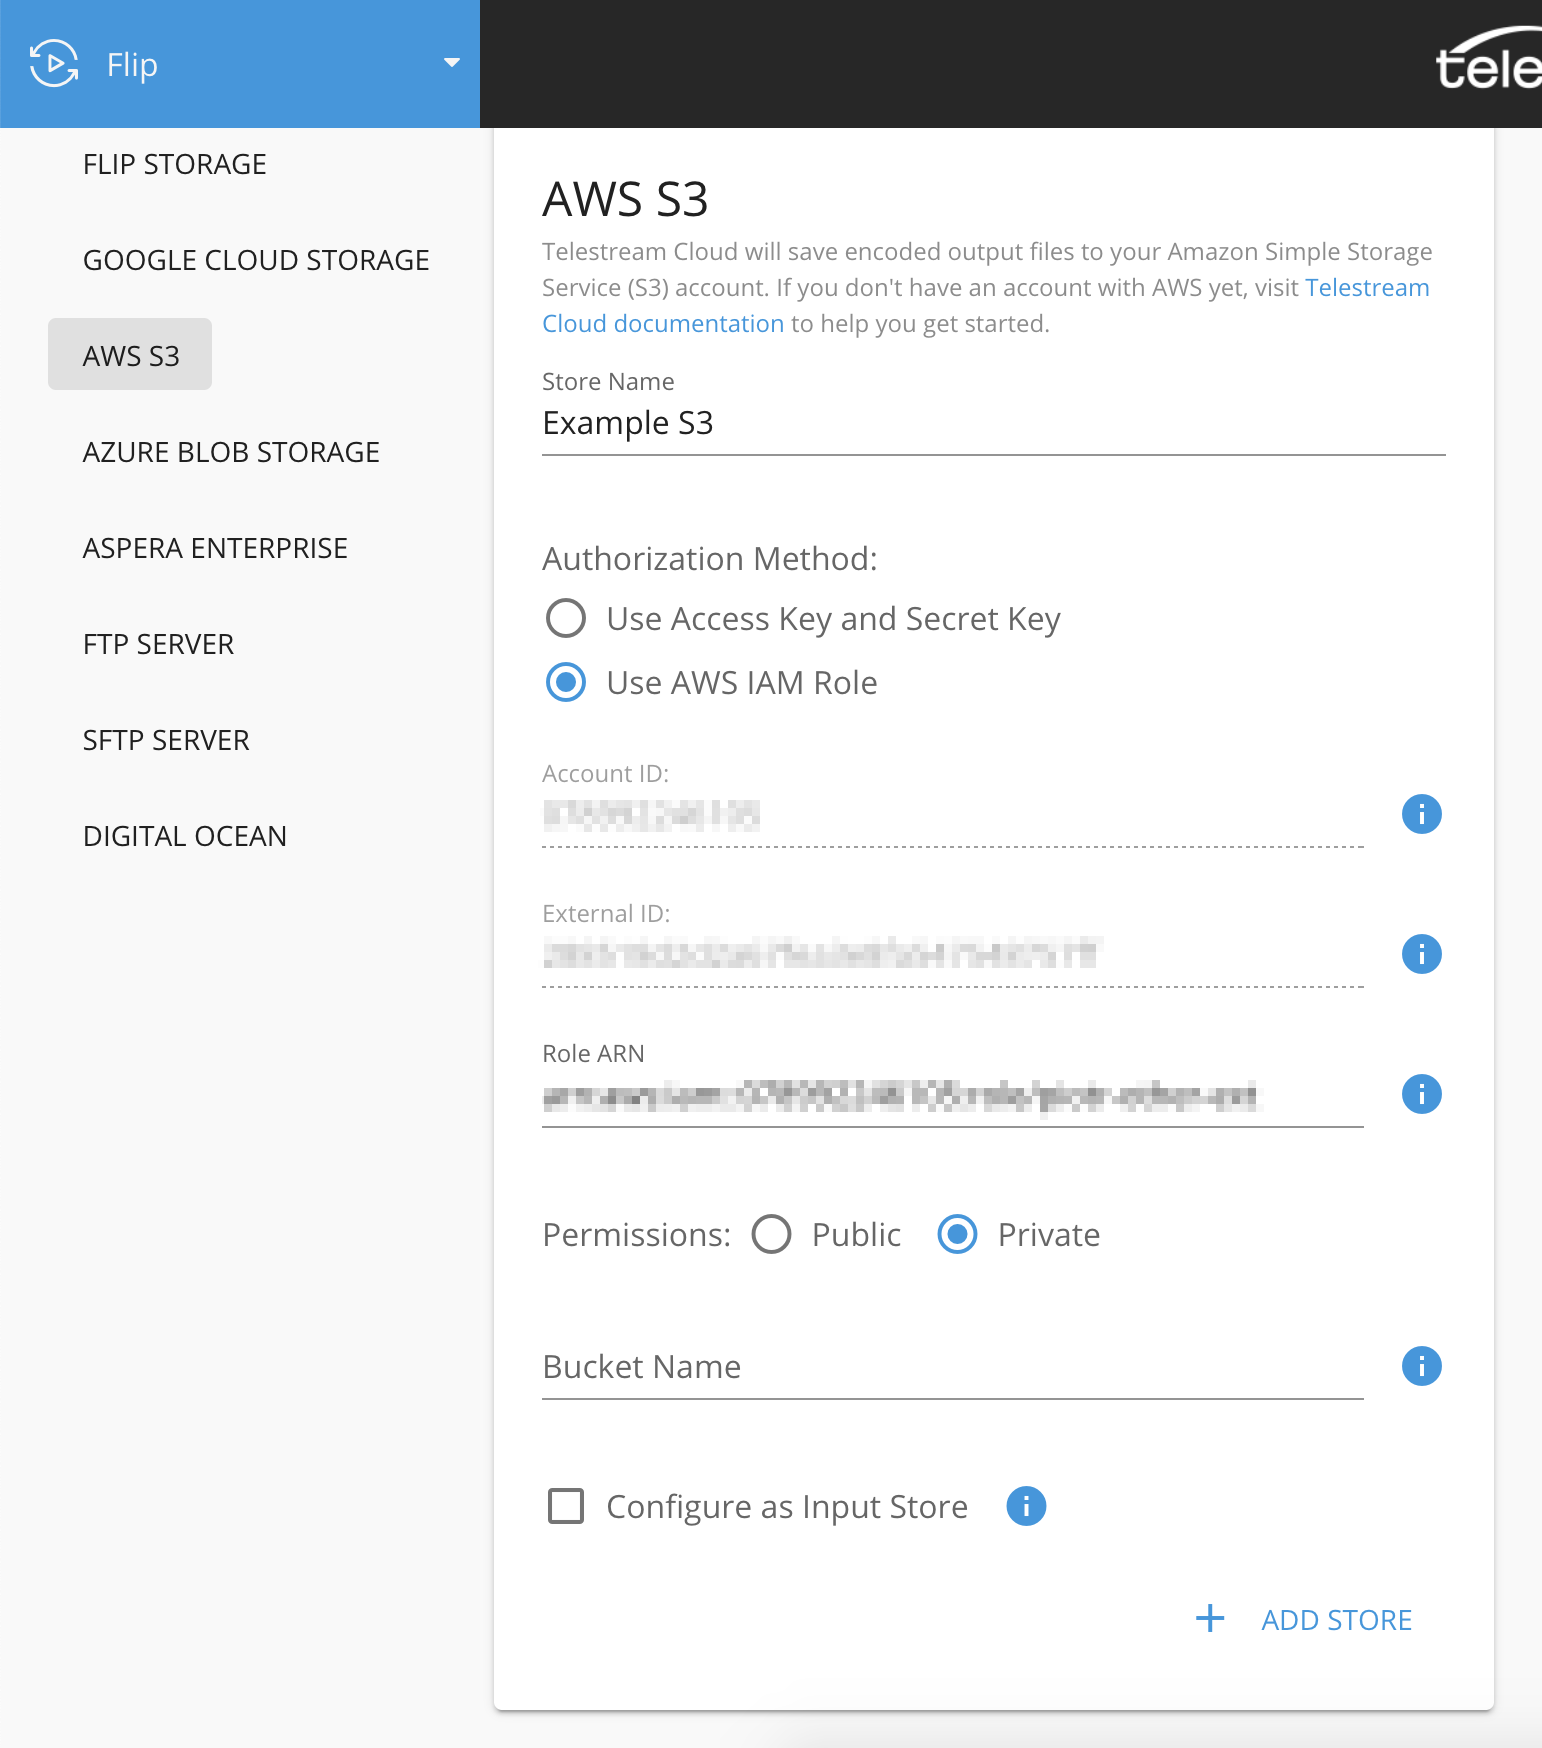
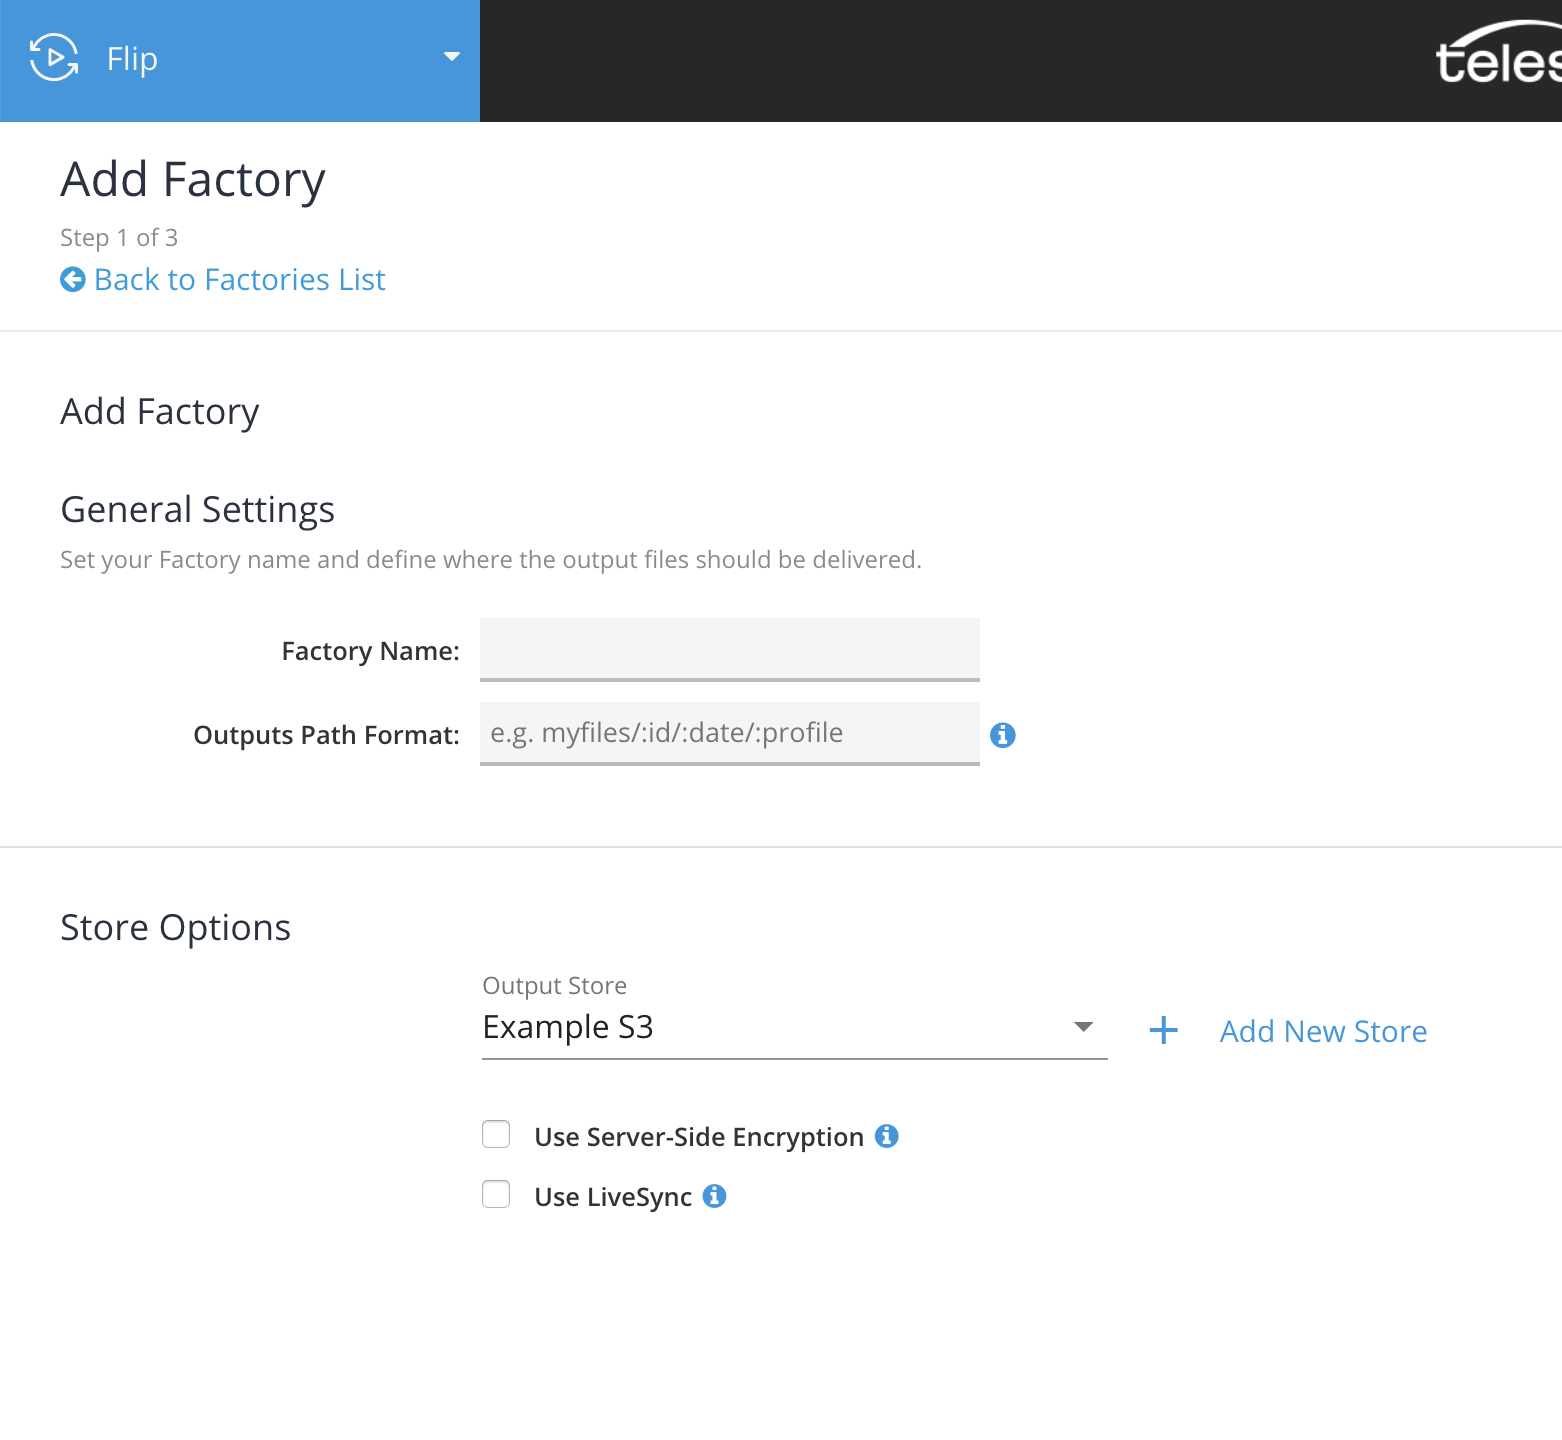
Click "Add store" to complete the process. Now you can use this store with any of our services as needed, for example as output location for your transcoded files when creating a new Factory in Flip service.
Updated almost 4 years ago
